Hey guys,
I just wanted to explain why I haven't really been posting. I had my last set of uni exams in November and I was super busy. I really wanted to concentrate on my exams as the results would essentially determine what I was going to be doing next year. This was my third and last year of uni and I was lucky enough to be accepted into a graduate program next year so I had to make sure that I would pass this semester in order to graduate on time. Luckily, I passed all my exams so I have a little bit more news to share.
I currently live in Sydney and I'll be moving to Canberra next year for my new job. I currently work as a computer technician at a retail store with the name resembling a fruit (I'm sure you can guess where I work) and I absolutely love my job but I needed to get on with life and put my degree to use. I'll be working in the Australian public service (government) and will be there for hopefully a very very long time :)
What this means is that I'm currently super busy in looking for a place to live and in preparing for my move. This means that I don't have extra time to blog as I'm spending every spare minute sifting through real estate ads. I have lots of ideas for posts and lots of posts that I've promised people so I hope you can hang around for me :) You may see the odd post here and there though as I know I won't be able to stay away.
I hope you all do stick around with me during this hiatus. I am still active on Twitter and Instagram so you can follow me there for updates :)
Thanks guys!
Jen
Monday 2 December 2013
Thursday 14 November 2013
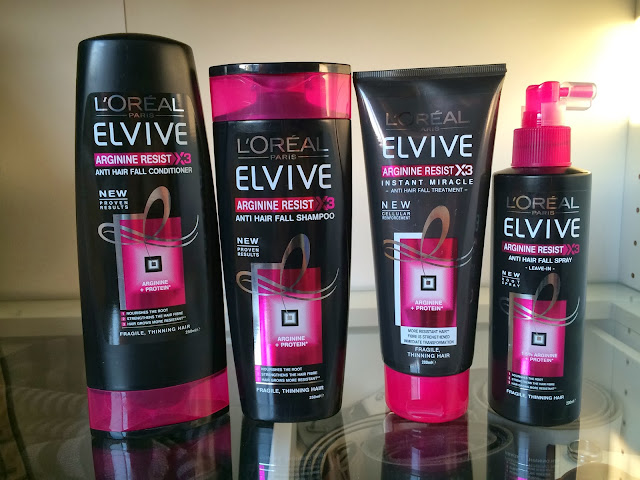
L'Oreal Elvive Arginine Resist x3 range
Once upon a time, I used to have really long and thick hair that would weigh me down and I was convinced that it made my face look fat. I couldn't understand why people would deliberately use products to try to volumize their hair. I used to beg my hairdressers to thin my hair out and I wasn't grateful for what I had when other people were spending money to get hair like mine.
About a year or so ago, I noticed that my hair was drastically falling out. Every time I brushed my hair, I would end up with handfuls of hair missing from my head. I also shed a lot of hair around the house and all over people I'm with. It's always been a joke that if you're around me, you'll leave with my hair stuck to your clothes. It hasn't just been happening to me, my mum has also noticed the same thing with her hair and together, we've been trying to find a way to stop our hair from falling out so much. Right now, we both have thin hair and its getting continuously thinner!
We recently discovered the new L'Oreal Elvive Arginine Resist x3 range. I actually saw an ad on Facebook and I was like "MUST. GET. SOME. NOW" so that day, I went down to the supermarket and bought all 4 products in the range. It's an anti-hair fall range that reinforces hair from the roots to stop it from falling out so much.

So far, we've only been using the shampoo and conditioner and we've been blown away by the results! We've definitely noticed a difference in hair loss in just the last week that we've been using this. I think the results can be attributed to the fact that the shampoo and conditioner leaves our hair extremely tangle free and super straight so that when we brush our hair, our brushes and fingers have nothing to catch onto.
I know that this isn't much of a review but I just wanted to let people know that the range is out there and that it would be good for people who are experiencing a lot of hair loss as well as people who want a shampoo and conditioner that will detangle their hair for them. I've used a lot of haircare in the past that has left my hair worse of and very tangled but nothing has given me amazing results like this range.
Wednesday 6 November 2013
Urban Decay Lipstick in Catfight and rant about samples
Ever since the new Urban Decay lipsticks were released, I'd been dying to try them. I was lucky enough to get my hands on a mini sample one to try and I'm happy that I did as I absolutely loved the formula. I've loved it so much that I've actually gone on to buy a full sized one. I think that this is a great example of how samples can really influence people to buy products. I often get turned down by sales assistants if I enquire about samples which usually means that I don't get to try the products so I never end up buying them. I understand if there actually aren't any samples but most sales assistants are quite rude and abrupt about it.
It's not that I'm walking up to them and asking for samples outright. Whenever I got to makeup counters to buy stuff, the sales assistants will always try to recommend something else (which is their job I guess) and if it's something that I haven't researched about before, I generally want to try a sample before I shell out my money for it. I'm absolutely fine if they don't have any but I'd appreciate if they didn't treat me awfully just because I dared to ask for a sample. Ultimately, they lose out because if I like something, I'll go back to the place I got the sample from and buy it from there. For example, I really liked the mini Urban Decay lipstick so I ended up getting the full size one from Sephora who gave me the sample rather than Beautybay who I could have gotten free shipping from.
Anyway, onto the lipstick:
The lipstick is really creamy and goes on really smoothly. I was quite surprised as I was expecting it to tug on my lips but it really didn't. It also has a formula that doesn't accentuate any dry spots on my lips. I thought it would be quite matte but its neither matte or glossy. It's basically a very creamy and very pigmented lipstick.
The wear time has also been quite good. It lasts for hours on end and yes, like most lipsticks, it will transfer onto drinks/cups and wear off as you eat but the pigmentation is crazy and it will leave a stain.
The lipstick looks more red than pink in the tube but it actually swatches like a hot pink. It really reminded me of MAC's Impassioned lipstick but Catfight is slightly darker and has more red tones than Impassioned.
I was quite sceptical that the Urban Decay lipsticks would be good but I'm happy that I did get to try it. I remember that Urban Decay used to have lipsticks that were quite large and had a dagger shaped "handle" but they discontinued them around September/October last year. They went on sale for like $3 each! Since then, I'd always wondered if Urban Decay would bring back lipsticks and it looks like they've made their lipsticks better than ever! I'd definitely recommend them. If you look at the picture above, the swatch was ONE swipe which just goes to show how pigmented they can be.
If you're one of my Australian readers, I'd recommend that you get them from Beautybay for the free shipping. Otherwise, you can order them from Sephora if you use a parcel forwarder :)
It's not that I'm walking up to them and asking for samples outright. Whenever I got to makeup counters to buy stuff, the sales assistants will always try to recommend something else (which is their job I guess) and if it's something that I haven't researched about before, I generally want to try a sample before I shell out my money for it. I'm absolutely fine if they don't have any but I'd appreciate if they didn't treat me awfully just because I dared to ask for a sample. Ultimately, they lose out because if I like something, I'll go back to the place I got the sample from and buy it from there. For example, I really liked the mini Urban Decay lipstick so I ended up getting the full size one from Sephora who gave me the sample rather than Beautybay who I could have gotten free shipping from.
Anyway, onto the lipstick:
 |
| Urban Decay lipstick in Catfight |
The lipstick is really creamy and goes on really smoothly. I was quite surprised as I was expecting it to tug on my lips but it really didn't. It also has a formula that doesn't accentuate any dry spots on my lips. I thought it would be quite matte but its neither matte or glossy. It's basically a very creamy and very pigmented lipstick.
The wear time has also been quite good. It lasts for hours on end and yes, like most lipsticks, it will transfer onto drinks/cups and wear off as you eat but the pigmentation is crazy and it will leave a stain.
 |
| Wearing Urban Decay lipstick in Catfight |
The lipstick looks more red than pink in the tube but it actually swatches like a hot pink. It really reminded me of MAC's Impassioned lipstick but Catfight is slightly darker and has more red tones than Impassioned.
 |
| Left: MAC lipstick in Impassioned Right: Urban Decay lipstick in Catfight |
I was quite sceptical that the Urban Decay lipsticks would be good but I'm happy that I did get to try it. I remember that Urban Decay used to have lipsticks that were quite large and had a dagger shaped "handle" but they discontinued them around September/October last year. They went on sale for like $3 each! Since then, I'd always wondered if Urban Decay would bring back lipsticks and it looks like they've made their lipsticks better than ever! I'd definitely recommend them. If you look at the picture above, the swatch was ONE swipe which just goes to show how pigmented they can be.
If you're one of my Australian readers, I'd recommend that you get them from Beautybay for the free shipping. Otherwise, you can order them from Sephora if you use a parcel forwarder :)
Sunday 3 November 2013
October Favourites!
I'M BACK! I know I haven't been blogging much lately but I have a really good excuse! I've been sick for a week with gastro (stomach bug) and it's been showing no signs of easing up so I haven't been in the mood to be on my laptop or getting out of bed unless I have to. I was basically getting fevers and really bad stomach pains whenever I ate anything so after sucking it up for 5 days, I finally went to the doctor who diagnosed me. I'm not a fan of taking medicine (I'm really forgetful!) so I was basically just napping after every meal to distract myself from the pain. It's also made me really tired so I've been sleeping a lot too.
As well as not blogging, I haven't even had the energy to read other blogs! The thing that's brought me back though is all the October favourites posts. I LOVE favourites posts and I always look forward to reading them :) So I have a lot of reading to catch up on and here's my October favourites (by the way, I'll be drawing my blogiversary giveaway winner when I'm a bit better).
1. Hakuhodo retractable slanted face brush: I'm not actually sure if that's the name but they don't put the model numbers or names on the brushes. The plastic casing is really cheap looking (and scratches easily) but the actual hairs on the brush are so so soft and it makes applying bronzer really easy.
As well as not blogging, I haven't even had the energy to read other blogs! The thing that's brought me back though is all the October favourites posts. I LOVE favourites posts and I always look forward to reading them :) So I have a lot of reading to catch up on and here's my October favourites (by the way, I'll be drawing my blogiversary giveaway winner when I'm a bit better).
 |
| October Favourites! |
1. Hakuhodo retractable slanted face brush: I'm not actually sure if that's the name but they don't put the model numbers or names on the brushes. The plastic casing is really cheap looking (and scratches easily) but the actual hairs on the brush are so so soft and it makes applying bronzer really easy.
2. Hourglass Veil Mineral Primer: I've been loving this primer for when I need my makeup to last all day. It can seriously keep foundation on my face for over 12 hours. The consistency is similar to Benefit's Porefessional.
3. Make Up For Ever Full Cover Concealer in number 7: If you've been reading my blog for awhile, you'd know that this is my absolute favourite concealer! I have about 6 tubes of this at the moment because I love it so much!.
4. Prestige Waterproof Eyeliner: Unfortunately, Priceline no longer stocks Prestige so I can't stock up on this :( It's an amazing eyeliner for tight lining and it doesn't smudge at all. I have super oily eyelids and whenever I use this, it stays put.
5. NARS Deep Throat Blush: I rediscovered this blush this month after not using it for a little while. I forgot how natural this blush looks on me!.
The movies that I put my makeup on in the photo above were a really good bargain at Coles. I got The Help for $9 and Couples Retreat for $5. I absolutely LOVE The Help and it's one of those books where I actually liked the movie as well. If you haven't seen it, it's definitely worth watching although I think that you should definitely read the book first.
Wednesday 16 October 2013
Favourite Lip Glosses!
Oops... It's been far too long since my last post! Life has gotten crazy busy recently as the uni semester is finishing up and I'm doing my last lot of assignments before the exam period. Other than that, I have no excuse for the lapse of time between posts! Anyway, I wanted to do a short post on my favourite lip glosses today :)
I'm not a big lipgloss fan at all and I'll normally skip over them when I'm shopping for makeup. However, on the odd occasion, one will catch my eye and no matter how much I try to resist buying it, I eventually cave. This has happened 3 times this year and I don't regret buying them at all :)
I first heard about the Clarins Eclat Minute in 01 Rose Shimmer (approx AUD$25) through Essie Button on Youtube and I pretty much tracked it down immediately afterwards. This is a super smooth and only slightly sticky lip gloss that I use for a no fuss no-makeup look. However, I've recently realised that when it wears off, my lips get really dry and flakey so I always need to have a lip balm handy.
I'm not a big lipgloss fan at all and I'll normally skip over them when I'm shopping for makeup. However, on the odd occasion, one will catch my eye and no matter how much I try to resist buying it, I eventually cave. This has happened 3 times this year and I don't regret buying them at all :)
 |
| Top 3 lipglosses Left to right: Clarins Eclat Minute, Bobbi Brown lip gloss and Lancome Gloss in Love |
The second lip gloss is the Bobbi Brown lip gloss in Pink Coral. I believe this was a limited edition lip gloss from a few months back (but is still available) and I just couldn't get it out of my mind! Every time I walked past Bobbi Brown at David Jones and Myer, I would pick it up and almost buy it but then I'd put it back because of the price tag (AUD$42). I'm sometimes a little ditzy and I'll put lipstick on chapped lips and go "oh crap, I have all these dry patches now!" so I'll whip this out and put a coat of lip gloss over my lips to disguise any dry skin and patchy areas on my lips.
And the last lip gloss is a new addition, the new Lancome Gloss in Love in 312 Blink Pink (AUD$42). This is a pinkish nude lip gloss with shimmer that isn't sticky at all! It's really smooth and when it does wear off, my lips aren't flakey at all which is why I really love this! The formula is just so luxurious that I really want to go back and buy a few more colours.
The swatches below were taken under natural day time lighting in the bathroom. There has been no filtering or editing. For more swatches, see my August Favourites Post and my July Favourites Post :)
 |
| Left to Right: Clarins Eclat Minute, Bobbi Brown Lip Gloss and Lancome Gloss in Love |
Wednesday 9 October 2013
Giorgio Armani Designer Lift Foundation and Luminous Silk Powder
I was at the Giorgio Armani counter at Myer a few weeks back and got chatting with a makeup artist (MUA) about the Luminous Silk foundation. He asked a bunch of questions about my skin type and the type of coverage that I wanted and he actually recommended the Designer Lift foundation instead. I'd said that I had combination skin and that I wanted a medium to full coverage foundation.
 |
| Products not true to colour. The powder is a tad lighter coloured in real life. Filter applied. |
I've been using both these products every day and I'm so impressed by them! It's definitely made me a lot more interested in the other things that Giorgio Armani has to offer like the lipsticks and lip glosses. I wouldn't say that my curiosity about the Luminous Silk Foundation has worn off so I'll probably go back for that one sometime but Designer Lift has knocked my socks off.
The foundation is quite runny and I find it really easy to put on using my fingers. The MUA said that the foundation could also be applied using a natural haired brush (not synthetic). I use one pump for my entire face and a little bit extra to bring the foundation down to my neck. I use number 5 (warm beige) in both the foundation and the powder, however, the powder is a tad too light. The foundation also looks like it's too light when I apply it but it does oxidise a bit so that it looks more natural about 15-20 minutes later. As reference, I sit between NC25-30 in MAC terms and use the following foundations:
- Laura Mercier Silk Creme Foundation in Bamboo Beige (closer to NC25) and Cashew Beige (closer to NC30)
- NARS Sheer Glow Foundation in Punjab
- Maybelline BB Cream in Medium
- Hourglass Immaculate Foundation in Nude
The foundation and powder seriously lasts all day. I'm writing this review 12 hours after I applied both products in the morning and they're still going strong. I can also always see my blush and bronzer on my face after I come home from work. The only places that my foundation and concealer (Make Up For Ever Full Coverage Concealer in number 6 and 7) will rub off on is around my nose.
The picture below was taken about 3 hours after I applied the foundation and powder. It looks exactly like when I first applied it. This was taken indoors under natural light and there are no filters.
 |
| Please excuse the dead look. I have no eye makeup or lip products on. |
The next picture is what it looks like after it's been on for 8 hours. I did take the photo on a different day which explains the outfit change. This was taken outdoors, not facing the sun and there are no filters.
 |
| Giorgio Armani foundation and powder after 8 hours. |
I've also swatched the foundation beside other face products that I use quite often so that you can get a better idea of the colour. I think number 5 in both these products would be more suitable for people with skin tones leaning towards NC25 rather than NC30. I really like the medium coverage the foundation gives so I'll be repurchasing the foundation in a darker shade. I'd also repurchase the powder in a darker shade.
Swatches from left to right:
- Giorgio Armani Designer Lift Foundation in number 5
- Maybelline BB Cream in Medium
- Laura Mercier Silk Creme Foundation in Bamboo Beige
- Make Up For Ever Full Cover Concealer in number 7
 |
| Indoors under natural light |
 |
| Indoors in the bathroom under natural light |
The cons of this foundation is that it does have a tendency to cling to dry patches. I have lots of those around my jaw and forehead so it will sometimes cling to them. It doesn't do it really badly and to be honest, it doesn't really bother me as it's not super evident unless you're up close to my face. The other con is the price! It retails for AUD$90. And for people who are probably wondering if this foundation is good for photos or not, it will occasionally give you a white cast. I wore it out one night and my face looked ok in the majority of photos except maybe 2 (out of 30).
One of the cons about the powder is also the price. It retails for AUD$88. The other con (depending on the way you see it) is that there's nowhere to put a powder puff or sponge. The powder is in a small magnetic compact that's very travel friendly and I love that it has a mirror! I don't use powder puffs or sponges (I carry retractable powder brushes) so this aspect doesn't annoy me but I know that it's a deal breaker for some people.
If you have oily skin or an oily t-zone, it's better that you use the foundation with a mattifying primer like the Benefit Porefessional or the Hourglass Veil Mineral Primer. When I pair the foundation and powder with these two primers, I can get away with not powdering at lunchtime if I really needed to (on a busy day or something). A primer that I can't use these products with is the NARS Pro-Prime Pore Refining Primer as it makes my face look like a grease ball. I know of people who love that primer so I'd recommend that you don't pair it with these products.
Monday 7 October 2013
Revlon Pink In The Afternoon Lipstick
I saw this lipstick on someone's blog a few months back and I'd been trying to track it down ever since. It was so hard to find and it seemed as if no one stocked it and I basically gave up on it. However, a few weeks back, I was killing time at Chemist Warehouse and found one tucked away in the Revlon stand. There was no official spot for it and no pricing. I grabbed it anyway and decided to buy it without even caring about the price as I wanted it that badly. Luckily for me, it rung up as $10 :D
 |
| Revlon Pink In The Afternoon Lipstick (not true to colour. It was hard to capture the pink tones) |
 |
| Left to Right: MAC Flamingo, Revlon Pink In The Afternoon Revlon Pink Lemonade Lip Butter |
 |
| FOTD: Giorgio Armani Designer Lift Foundation in 5 Giorgio Armani Luminous Silk Powder in 5 Make Up For Ever Full Cover Concealer in 6 and 7 NARS Laguna Bronzer MAC Eyebrows in Lingering Laura Mercier Mascara Revlon Pink In The Afternoon Lipstick |
It's perfect for people who don't normally wear lipstick much as it's not an "in your face colour" and it won't push you out of your comfort zone. It's also one of those lipsticks that you can pop on when you go out and you'll be having your photo taken as there's no chance of you looking back at the photos and going "what's with the clown lips?".
If I ever come across this lipstick again, I'd buy myself some backups. I think this lipstick is a 10 out of 10.
P.S. For the people who asked about the Giorgio Armani Designer Lift Foundation and Luminous Silk Powder that I purchased a few weeks back, I'm wearing it in the last photo. I'd already had it on for 8 hours when I took that photo (no filtering) and it still looks perfect!
Friday 4 October 2013
My Mario Badescu Skincare Regime
 |
| Mario Badescu Skincare |
However, it really sparked my interest in the brand and I've since purchased 3 additional products. I went to Kit Cosmetics with the intention of only purchasing the toner but the sales assistants there are always so knowledgable and helpful that I couldn't help but buy the other 2 products as well.
Buttermilk Moisturizer ($28.95): I picked this up because it was blue! It really caught my eye and it's meant to be good for my combination/sensitive skin. I did put off using it for ages though because I couldn't get my head around the blue colour and it freaked me out a little. When I got around to using it though, I found out that it's not quite hydrating enough for me and it also smells like grass. The annoying thing about the packaging for this (and the toner) is that it has a bit of a... pull up spout(?) where moisturiser can sometimes get clogged up in and dry up.
 |
| Spout/opening on the toner and moisturiser |
Aloe Vera Toner ($22.95): I've been using this every morning and night and I'm not sure if it really does anything for me. I just felt like I had to have a toner in my skincare regime. This has no fragrances or alcohol which ticked all the boxes for me (it's so hard trying to find a toner that doesn't have those 2 ingredients!). I pour this onto a cotton pad and wipe it all over my face. It does leave a bit of a tingling sensation.
Vitamin C Serum ($64.95): The sales assistant sold me on this when she said that all the staff at Kit Cosmetics swore by this. It's meant to brighten my complexion and I use it every other night. I've heard that Vitamin C serums are also good for fading acne scars but I'm not sure about this. It hasn't stopped me from slathering it on generously over acne scars though :P I've definitely seen an improvement in brightness on the days after I use the serum.
I've really enjoyed using the Aloe Vera Toner and the Vitamin C serum so I'll definitely repurchase those. I wouldn't repurchase the moisturiser as it's quite expensive and not moisturising enough.
What's your go to skincare item to help with breakouts and acne?
Tuesday 1 October 2013
September Favourites!
I seriously can't believe that September is over and we're less than 3 months away from Christmas! I'm super excited for Christmas and I'm already planning a post about what to buy for the significant people in your life so keep an eye out for that around November/December. Feel free to leave a comment on this post if you'd like me to include ideas for specific people (e.g. boyfriend, best friend etc).
So for the whole of September, I reached for the same products over and over again. They've worked so well for me that I haven't felt the need to use anything else.
 |
| September Favourites! |
1. Giorgio Armani Designer Lift Foundation SPF 20 in number 5 (warm beige) (AUD$90): I bought this a few weeks back and I've used it every day since. It's a very runny fluid that can be built up to a medium coverage. I was sold this as a "full coverage foundation" which it actually isn't and it doesn't cover my acne scarring. I like that even when you build it up, it still looks natural and not cakey. The colour is a perfect match for me too (I'm between NC25-30 in MAC terms).
2. Giorgio Armani Luminous Silk Powder in number 5 (AUD$88): I bought this at the same time as the foundation as I really need to set my foundations for them to last all day. It is a tad too light for me as I'm quite heavy handed when I use it so I'm on the hunt for another powder but this was a staple in September.
 |
| Giorgio Armani Luminous Silk Powder and MAC Duo Lash Comb/Brow Brush |
4. MAC Duo Lash Comb/Brow Brush (AUD$13): This is a travel friendly lash comb and brow brush. I carry it everywhere with me as I always sleep in and end up doing my makeup on the train to work or to uni. I only use the brow brush end though and it's really efficient at combing my brows before and after shading them in.
5. MAC Eyebrows in Lingering (AUD$30): I've been using this brow pencil all year and I'm onto my third one as I seriously use it every day. A MAC sales assistant recommended this one for me and it's a tad too light but I can get away with it. It makes my eyebrows look more soft than sharp and defined (which I prefer) although I'm looking at buying a darker one soon.
 |
| Left to Right: MAC Eyebrows in Lingering and Bourjois lip crayon in |
6. Bourjois Color Boost Lip Crayon in Peach on the Beach (AUD$15): I really put of buying this lip crayon as I already have SO MANY lip crayons and I rarely get a chance to use them. However, I bit the bullet when Bourjois went on sale at Priceline and I picked one up for 25% off. It's a gorgeous peach colour that pulls a bit pink on my lips. It's super glossy and really smooth. However, the one that I got was already a bit broken and the top part of the lip crayon completely snapped off and then I left it in the car last week and my boyfriend found it completely melted :( I was so devastated and I was freaking out that I wouldn't be able to replace it as I'd bought the last one from my local Priceline. I ended up running to the city Priceline store after uni and I luckily found another one!
I'd love to know what your September favourites were (link me your blogs if you posted about it!) or if you've tried any of the things I listed in this post :)
Saturday 28 September 2013
My eye cream journey!
I only started to get into using eye creams this year as I've never really been concerned about under eye bags and darkness under the eyes. I started to use them though as I thought that I might as well start using them sooner rather than later. I know that there are people who say that eye creams are a waste of money and unnecessary but I really like patting eye cream on and just taking a quick moment in my day to close my eyes and relax :)
There are 2 eye creams that I've been rotating a lot. The first one is the Kiehl's Creamy Eye Treatment with Avocado (AUS$39/14g) and the second is the RE9 Arbonne Corrective Eye Crème (AUS$77/15ml). I think I've mentioned before that I don't like my skincare items to have alcohol or fragrances in them (things with fragrances make my skin itchy and I just have a personal preference to avoid alcohol where possible) so I was really limited in the eye creams that I could use. Every time I found an eye cream that I wanted to try, I would look at the ingredients list and have to put it back because fragrance or alcohol featured at the top of the ingredients list. I'm not an expert in chemicals and anything of that sort so I don't know if these eye creams have any other nasties in them or not but they haven't irritated me at all so far.
Prior to using eye creams, I never worried too much about eye bags or dark under eyes and I currently still don't. The only time that dark under eye bags were really obvious on me was when I hadn't slept well for days at a time. After using eye creams every night, I would say that the skin around my eyes has stayed quite smooth (as it should) and I haven't had an episode of dark under eye bags even though I don't sleep all that well due to uni assignments.
The most important thing about these eye creams though is the fact that I don't get any milia at all with them! My biggest concern with using rich creams in the eye area was getting small white bumps that would be hard to get rid of. I would repurchase both the products based on this alone.
The Arbonne Eye Crème was sent to me for review and I've really enjoyed trying a more expensive eye cream and seeing if the results were worth paying more for. After testing it, I get the same results from it as the Kiehl's eye cream that I purchased. If I had to choose between them, I would choose the Kiehl's one based on the packaging. I love the idea of an eye cream in a jar rather than a pump bottle but that's my personal preference. I know that there's a whole anti-jar brigade out there who argue that when a product is exposed to air, the ingredients become less potent. I totally understand that which is why I purchased the smaller tub (so that I could use it up quickly). For those anti-jar people, go for the Arbonne one, you can't go wrong with it. The pump has never gotten jammed on me before and it'll obviously keep fresher for longer since the product doesn't come in contact with the air.
There are 2 eye creams that I've been rotating a lot. The first one is the Kiehl's Creamy Eye Treatment with Avocado (AUS$39/14g) and the second is the RE9 Arbonne Corrective Eye Crème (AUS$77/15ml). I think I've mentioned before that I don't like my skincare items to have alcohol or fragrances in them (things with fragrances make my skin itchy and I just have a personal preference to avoid alcohol where possible) so I was really limited in the eye creams that I could use. Every time I found an eye cream that I wanted to try, I would look at the ingredients list and have to put it back because fragrance or alcohol featured at the top of the ingredients list. I'm not an expert in chemicals and anything of that sort so I don't know if these eye creams have any other nasties in them or not but they haven't irritated me at all so far.
 |
| Left to right: Arbonne Corrective Eye Crème and Kiehls Creamy Eye Treatment with Avocado |
The other thing that I love about these eye creams is that they're not heavily fragranced. I've used a lot of skincare products that smell like a florist or smell like a swamp and they've always made me gag or made me feel like my face is on fire or itchy. It's safe to say that I barely even register a scent with the Kiehl's eye cream but if I smell it really closely, it has a very faint sunscreen smell. The Arbonne one has a faint sour/floral/citrus scent. I'm actually not sure how to describe it but it does have a slightly sour scent if you smell it really closely.
Edit: I did some research on the Arbonne eye creme as I was trying to pinpoint the smell and it turns out that it contains orange oil, clover and rosemary in it. It also has alcohol in it which i try to avoid but it's mid way down the list rather than at the top.
 |
| Arbonne Corrective Eye Crème consistency |
 |
| Kiehl's Creamy Eye Treatment with Avocado |
The most important thing about these eye creams though is the fact that I don't get any milia at all with them! My biggest concern with using rich creams in the eye area was getting small white bumps that would be hard to get rid of. I would repurchase both the products based on this alone.
 |
| Pump of Arbonne Corrective Eye Crème |
Sunday 22 September 2013
IMATS Sydney 2013
As some of you would know, I went to IMATS in Sydney yesterday and I bought myself a few things :) I'd been looking forward to IMATS for months and I managed to drag myself out of bed nice and early in the morning to head to Darling Harbour where IMATS was being held. I was planning to be there before 9am but my boyfriend was running late as usual so we got there around 9.30am.
When we got there, there was a small line outside where people had to wait to get wristbands. Our wait was about 5-10 minutes but I can only imagine what the line looked like at 8.30am!
Tip for next year: If you can't be bothered to wait in line and can afford to pay an extra $15 for your ticket, don't buy it beforehand and pay $50 at the door for your ticket instead (the tickets pre-sell for US$35). There was no one in that line at all. However, this would be dependant on whether or not the tickets sell out before you get there.
The main reason I went to IMATS though was because I wanted to pick up a few Hakuhodo brushes. You can buy them online but I figured that instead of paying for shipping, it was better for me to just pay for my IMATS ticket and buy them in person. The brushes were ALL so soft and super expensive. The queue was quite orderly except except for the people who didn't understand the concept of a queue and pushed in. The sales people were all Japanese and so friendly. They kept offering trays for us to hold our brushes in and giving us advice about which brushes were best for what. Unfortunately, the brush that I wanted had sold out and I think that the girl in front of me bought the last one.
Tip: If there's something that you specifically want, go to the stand straight away! Don't take your time to wander around. There'll be plenty of time for that after you buy what you came for!
I picked up H2274 and H3007. H2274 ($54) is a powder and liquid brush. H3007 ($42) is a retractable angled face brush. There were no "discounts" at Hakuhodo but the benefit of buying them at IMATS was that you didn't have to pay any conversion fees. The total cost of the 2 brushes was US$96 so I paid AUD$96. If I'd bought them online, I would've had to pay the bank fees for the currency conversion as well as pay extra for the brushes as the Australian dollar is not on par with the US dollar.
I also stopped by the Velour lash stand. They're super expensive lashes that are made out of mink hair but it's ok as the minks don't get hurt in making the lashes (or I wouldn't buy them!). They normally retail for $29.99 but they were $23 a pair at IMATS. I picked up Are Those Real? and Got it from my Momma! (which will be shipped later as they didn't have any stock). I do kind of regret buying 2 pairs though due to the cost of them!
The next couple of things were purchased from Embryolisse and Model Rock (I think). Embryolisse's Lait-Crème Concentre was $25 for $75mL compared to the usual $35 cost. The Duo lash glue was $7.95 compared to the normal $9.95 and the lashes were $5.95 each compared to the usual $11.95/pair. There was also a "buy 10 for $55" deal on them. I picked up 2 pairs in Cleo. To be honest, if I'd bought the Cleo lashes first, I probably would've only bought one pair of lashes from Velour. I passed on getting any other lashes as I couldn't find any others that looked natural. Most of them had kinks in them or were just really poor quality.
And lucky last, I also checked out the Bdellium stand as they had adorable pink brushes! I didn't buy any though as I didn't know what the cost was and I thought that they'd be really expensive. I'm absolutely kicking myself for not buying any though as I've been told that they were all around $15 or under.
And that concludes my IMATS experience :) Did any of you guys go and how did you find it? I left after an hour as I'd run out of money (I was trying to be really good and stick to my budget) and my boyfriend and I wanted to go eat lunch. I was also getting quite annoyed by the rough crowd. I felt like I was really being pushed around at some stands.
When we got there, there was a small line outside where people had to wait to get wristbands. Our wait was about 5-10 minutes but I can only imagine what the line looked like at 8.30am!
Tip for next year: If you can't be bothered to wait in line and can afford to pay an extra $15 for your ticket, don't buy it beforehand and pay $50 at the door for your ticket instead (the tickets pre-sell for US$35). There was no one in that line at all. However, this would be dependant on whether or not the tickets sell out before you get there.
 |
| Crazy crowd at the Mac Pro stand around 10.30am |
I'd planned to buy a few things from MAC but skipped buying anything as the line was pretty crazy. The picture above shows what it was like at 10.30am when I was leaving and keep in mind that the MAC Pro stand is in the top right hand corner! I probably would've waited if I hadn't run out of money :P
I also bypassed the Make Up For Ever stand as their lines were quite similar to MAC. PM Studio had a stand selling MUFE products so I lined up there instead. Well actually, they didn't really have a line. People just stood wherever they wanted to and tried to catch the eye attention of one of the workers. It kind of worked in that there were heaps of people who were spending ages on swatching and there were people like me who knew exactly what they wanted. I picked up a Make Up For Ever Full Cover Concealer in number 6. I already have numbers 7 and 8 but I needed a lighter one for my jawline. It was $30 compared to US$32 from Sephora and the normal $43 from PM studio.
Tip: If a stand has a crowd rather than a line and you know what you want, stand in a spot where it'll be easy to catch the sales people's attention. Don't be silly and stand on the side like I did. Don't look down as the moment that you do, they'll look up and miss you again.
 |
| Make Up For Ever products at PM Studio's stand |
 |
| Make Up For Ever Full Cover Concealer in number 6 |
The main reason I went to IMATS though was because I wanted to pick up a few Hakuhodo brushes. You can buy them online but I figured that instead of paying for shipping, it was better for me to just pay for my IMATS ticket and buy them in person. The brushes were ALL so soft and super expensive. The queue was quite orderly except except for the people who didn't understand the concept of a queue and pushed in. The sales people were all Japanese and so friendly. They kept offering trays for us to hold our brushes in and giving us advice about which brushes were best for what. Unfortunately, the brush that I wanted had sold out and I think that the girl in front of me bought the last one.
Tip: If there's something that you specifically want, go to the stand straight away! Don't take your time to wander around. There'll be plenty of time for that after you buy what you came for!
 |
| Hakuhodo Brushes |
 |
| Hakuhodo Brushes |
I also stopped by the Velour lash stand. They're super expensive lashes that are made out of mink hair but it's ok as the minks don't get hurt in making the lashes (or I wouldn't buy them!). They normally retail for $29.99 but they were $23 a pair at IMATS. I picked up Are Those Real? and Got it from my Momma! (which will be shipped later as they didn't have any stock). I do kind of regret buying 2 pairs though due to the cost of them!
 |
| Velour lash stand |
 |
| Are Those Real? lashes |
 |
| Embryolisse Lait-Crème Concentre |
 |
| Duo lash glue and Model Rock lashes in Cleo |
And lucky last, I also checked out the Bdellium stand as they had adorable pink brushes! I didn't buy any though as I didn't know what the cost was and I thought that they'd be really expensive. I'm absolutely kicking myself for not buying any though as I've been told that they were all around $15 or under.
 |
| Bdellium brush stand |
And that concludes my IMATS experience :) Did any of you guys go and how did you find it? I left after an hour as I'd run out of money (I was trying to be really good and stick to my budget) and my boyfriend and I wanted to go eat lunch. I was also getting quite annoyed by the rough crowd. I felt like I was really being pushed around at some stands.
There were lines at every stand and people kept complaining or pushing in. I felt that lining up gave me more opportunity to swatch and look at things while waiting but some people were very touchy about the lines. If you do go to IMATS next year, bring a friend so that you have someone to talk to while you wait :)
I took my boyfriend along and he was the best entertainment ever! I wrote down some of the things he said so that I wouldn't forget because they were so funny at the time. He doesn't understand the point of makeup and why we love it so much.
"Everyone there was a makeup addict.... I saw so much cake face!"
"It looks like they just grabbed it (makeup) and *smacks his hand into his face*"
"One girl was trying to promote her makeup to someone and said "I'm wearing it right now" and I was thinking 'b*tch please... you look like an orange!'"
"The guy you bought lashes from.... Dear lord!" (He had giant panda eyes with glitter and sparkles)
"It's like Comic Con... but for makeup!"
"It's like Comic Con... but for makeup!"
And one last thing, if you're going next year, don't forget to take makeup wipes with you! Take along a little travel pack or something if you plan on doing lots of swatches.
- Jen
Friday 20 September 2013
Her Fashion Box September Edition
I came home today to my Her Fashion Box subscription which was a really nice surprise as I didn't get the tracking email this week. I obviously opened it straight away and took photos so that I can share with you what I got :) I hope it'll be helpful to people who may want to sign up with Her Fashion Box or who want a sneak peek of their September box :)
Clutch: The clutch is definitely not my style but they've styled it really nicely in the magazine. It has a chain so that you can wear it. I wish I got the classic box because their clutch was black with gold studs.
Silver Ring: Oh my gosh! The ring is absolutely gorgeous! I'm just really sad that it doesn't fit on any of my fingers as it's really big. I think it can be adjusted but I also have small fingers so it's still too big. Every box got this ring but in different colours.

Silver Bracelet: I kind of liked the bracelet but it reminds me of those really ghetto... masculine ID bracelets. Everyone also got this and in different colours. Apparently the colours we got were based on our profile but I swear I would've put gold before silver.
Pure Moisture Coconut Body Scrub: I love body scrubs and it's a really cute small size. It'd be enough for one use on the body so I think it should be popped in a drawer for when you go travelling.
Maybelline Color Show Nail Polishes in Coral Crush and Blue Freeze: This was probably the best part of the box! The nail polish colours are absolutely gorgeous. I've heard a lot of good things about the Maybelline nail polishes! (and they keep going half price at Priceline and Chemist Warehouse!)


 |
| Her Fashion Box September Magazine |
Clutch: The clutch is definitely not my style but they've styled it really nicely in the magazine. It has a chain so that you can wear it. I wish I got the classic box because their clutch was black with gold studs.
 |
| Clutch |
 |
| Inside clutch |
Silver Ring: Oh my gosh! The ring is absolutely gorgeous! I'm just really sad that it doesn't fit on any of my fingers as it's really big. I think it can be adjusted but I also have small fingers so it's still too big. Every box got this ring but in different colours.

Silver Bracelet: I kind of liked the bracelet but it reminds me of those really ghetto... masculine ID bracelets. Everyone also got this and in different colours. Apparently the colours we got were based on our profile but I swear I would've put gold before silver.
 |
| ID bracelet |
 |
| Bracelet on arm |
Pure Moisture Coconut Body Scrub: I love body scrubs and it's a really cute small size. It'd be enough for one use on the body so I think it should be popped in a drawer for when you go travelling.
 |
| Coconut Body Scrub |
Maybelline Color Show Nail Polishes in Coral Crush and Blue Freeze: This was probably the best part of the box! The nail polish colours are absolutely gorgeous. I've heard a lot of good things about the Maybelline nail polishes! (and they keep going half price at Priceline and Chemist Warehouse!)

LonVitalite facial mask, Designer Brands Chubby Pencil and Eyeliner: I'm not a huge fan of LonVitalite or Designer brands. I'm pretty certain that I've gotten LonVitalite facial masks in other beauty boxes before and I remember being really put off by the poor english writing on the packaging. I felt like it wasn't a trustworthy brand. I also don't like Designer Brands as I've tried their eyeliners before and haven't liked it. In saying that though, the chubby pencil is a really gorgeous nude pink shade :)

I think that despite me not liking some of the box (but that's the nature of subscription boxes!), it's well worth the money. I wish that I'd gone with the classic box (for the clutch) and gotten gold or rose gold jewellery instead of silver. I do love the concept of Her Fashion Box and I'm looking forward to seeing what they bring out in the coming months :)
Now for some exciting news, I'm heading to IMATS in Sydney tomorrow and I'll definitely be blogging about it as it's my first time going. As I'm going to be lucky enough to buy some goodies there, I feel like I might accidentally neglect the Her Fashion Box that I've just reviewed so I've decided to give it away to one of my readers. Just leave a comment saying what you liked most about the box (and your email address) and I'll choose a winner in 1 week :)
Let me know if you're also going to IMATS tomorrow (Tweet me! @jjjwei). It'd be nice to see some friendly faces there :)
Edit: The winner is Michelle! Congrats :) I've emailed you.
Monday 16 September 2013
Benefit Haul
I did a Benefit haul recently (you can read about it here) for some goodies for myself but then I decided to do another order as I needed to buy some birthday presents. Obviously, I didn't want to pay for shipping if I didn't have to, so I bought myself some more stuff in order to qualify for free shipping :)
Now onto the products:
1) Benefit Rockateur Blush US$28
This is Benefit's newest blush and I wanted to try it because I'd read reviews that said that it was softer in texture than the other Benefit blushes. I also didn't have a rose gold blush in my collection already so I was kind of curious. I know people who have done reviews on this blush and have been like "oh... Benefit have reduced the size of the blush but kept it at the same price" but seriously, does anyone actually often finish a blush..... or like ever? So does it really matter?....
I was planning on doing a review but this blush just doesn't photograph well as it's so sheer. I did a swatch on my arm using the brush it came with, a different blush brush and my fingers and it just wouldn't show up very well! It's a sheer but slightly build-able blush so it's noticeable when it's layered onto the cheeks but it's so annoying to photograph! I may still do the review...
Here's an attempt at trying to swatch it:
2+3) Benefit Hydra Smooth Lip Colours in Juicy Details (natural pink) and Tutti-Cutie (sheer coral) US$19 each
These are SO amazingly smooth! They just glide right across the lips and they're an absolute dream! I love these so much. Juicy Details is a medium coverage and Tutti-Cutie is very sheer. They're just amazing for a no-fuss lip product.
4) Benefit Dandelion blush US$28
I haven't actually used this one yet but I've been wanting it for like 2 years now but I could never justify buying it before. I'll let you know how I go with it :)
 |
| Benefit Haul |
Now onto the products:
1) Benefit Rockateur Blush US$28
This is Benefit's newest blush and I wanted to try it because I'd read reviews that said that it was softer in texture than the other Benefit blushes. I also didn't have a rose gold blush in my collection already so I was kind of curious. I know people who have done reviews on this blush and have been like "oh... Benefit have reduced the size of the blush but kept it at the same price" but seriously, does anyone actually often finish a blush..... or like ever? So does it really matter?....
I was planning on doing a review but this blush just doesn't photograph well as it's so sheer. I did a swatch on my arm using the brush it came with, a different blush brush and my fingers and it just wouldn't show up very well! It's a sheer but slightly build-able blush so it's noticeable when it's layered onto the cheeks but it's so annoying to photograph! I may still do the review...
 |
| Benefit Rockateur Blush |
 |
| Benefit Rockateur swatch |
2+3) Benefit Hydra Smooth Lip Colours in Juicy Details (natural pink) and Tutti-Cutie (sheer coral) US$19 each
These are SO amazingly smooth! They just glide right across the lips and they're an absolute dream! I love these so much. Juicy Details is a medium coverage and Tutti-Cutie is very sheer. They're just amazing for a no-fuss lip product.
 |
| Benefit Hydra Smooth Lip Colours Left to Right: Juicy Details and Tutti-Cutie |
4) Benefit Dandelion blush US$28
I haven't actually used this one yet but I've been wanting it for like 2 years now but I could never justify buying it before. I'll let you know how I go with it :)
 |
| Benefit Dandelion Blush |
What Benefit products should I try next?
Friday 13 September 2013
Get To Know Me Tag!
I've seen this tag floating around and I found a set of questions that I thought were quite interesting to answer (I found them on the Tried and Tested blog). I thought I'd give them a go and let you get to know me better :)

I'd love to know your answers to these questions!

1. Bold eyes or bold lips?
Bold lips! I love a bright pink or coral lipstick.
2. If you could only blog about one brand's products, which brand would it be?
LUSH! I love their products and they have such a huge range of stuff that I could blog about. I have quite a few favourite products from LUSH but there heaps of things that I haven't tried yet.
3. Your most used/loved product.
 |
| Make Up For Ever Full Cover Concealer |
Make Up For Ever Full Cover Concealer! I cannot live without this stuff! I have like 5 tubes of it. I love using this for concealing scars and pimples around my forehead, temple and nose area. It might seem a tad expensive but it honestly lasts forever.
4. Would you rather have forever flawless skin and not be able to wear any other makeup or never be able to wear a base (foundation, bb cream) but being able to wear eyeshadow, mascara, blush, eyeliner, lipstick etc.?
Hmm... I would absolutely LOVE to have forever flawless skin but it would be no fun to not be able to play with makeup like lipstick and blush. I think I would prefer not to wear a base but only if I was still allowed to use concealer. Concealer wouldn't count as a base right?
5. The one thing you hate most about applying makeup.
Trying to cover blemishes! I have really bad acne scarring in some places (like my right cheek) and it's near impossible to completely cover them up.
I'd love to know your answers to these questions!
Subscribe to:
Posts (Atom)